Let's build an RQT plugin in ROS2
1. Introduction to ROS2 and RQT
Since you’ve landed on this page, it’s safe to assume you have a grasp of what ROS2 (Robot Operating System 2) is. For the uninitiated, ROS2 is the next generation of ROS, providing a framework for writing software for robots that includes a collection of tools, libraries, and conventions aimed at simplifying the task of creating complex and robust robot behavior across a wide variety of robotic platforms. Now, let’s shift our focus to a particularly interesting and integral part of the ROS2 ecosystem - RQT.
What is RQT and Its Importance in ROS2
Imagine if you could give your robots a brain transplant with just a few clicks. That’s RQT for you, a Qt-based plugin development in ROS that let’s you whip up a reuseable and scalable GUI application in a few minutes.
Why is RQT so important in ROS2?
-
Versatility and Flexibility: Thanks to RQT’s plugin-based architecture, crafting new plugins is so easy that you might find yourself making one just for fun. And when you realize you’ve just saved yourself hours of head-scratching over terminal commands, you’ll want to bake a cake for RQT.
-
Improved User Experience: RQT is like the friendly robot in those sci-fi movies that translates alien tech into good ol’ human. Its graphical interface means you don’t need to decipher cryptic terminal texts anymore. It’s making robotics accessible to everyone, from the curious newbie to the seasoned engineer who’s seen one too many terminal screens.
2. Setting the Stage: Prerequisites and Environment Setup
Alright, let’s roll up our sleeves and get down to business. First order of the day: make sure your Linux machine is all fired up and ready to go. And if you’re reading this from the cozy confines of Microsoft, no worries! The Windows Subsystem for Linux (WSL) has kinda got your back—just. I’m going to take a wild guess that you’ve got a handle on the basics of ROS2, including the sacred ritual of sourcing your environment. So, let’s skip the formalities and dive into the toolbox you’ll need to make some magic happen.T### The Journey Begins: Installing Qt
First things first, grab the Qt installer from the official Qt download page. Once you’ve got that, it’s time to set things up:
- Open a terminal and navigate to the directory where you’ve downloaded the Qt installer.
-
Update the file permissions to make it executable with the following command:
chmod +x qt-unified-linux-x64-4.7.0-online.run ./qt-unified-linux-x64-4.7.0-online.run -
Install the necessary Qt packages for your development environment:
sudo apt install qtbase5-dev qtchooser qt5-qmake qtbase5-dev-tools
Setting Up Qt Creator for RQT Plugin Development
Now that Qt is installed, it’s time to fire up Qt Creator and start a new project:
- Open Qt Creator and select Create New Project.
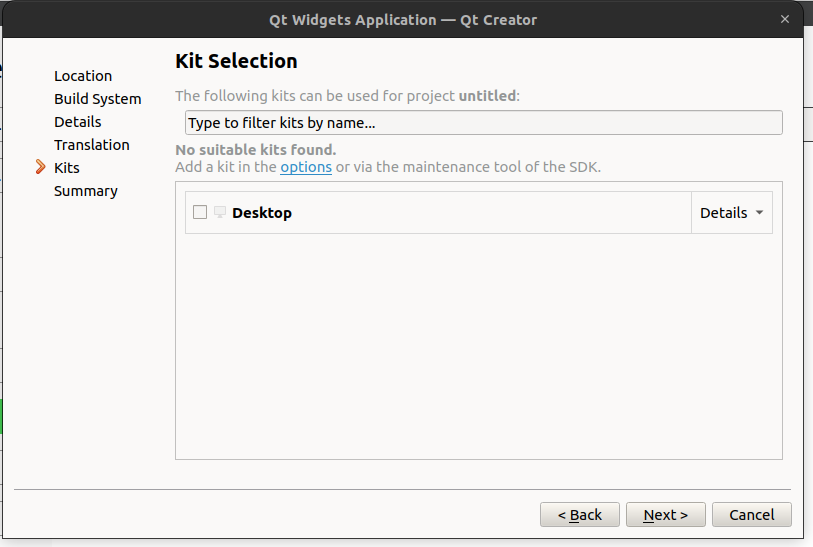
- Navigate through the setup steps until you reach the Kit Selection tab. It’s here you’ll want to make a crucial choice: select Widget instead of QWindow for your project type, ensuring you’re on the right track for RQT plugin development.
Navigating the Qt Creator Setup
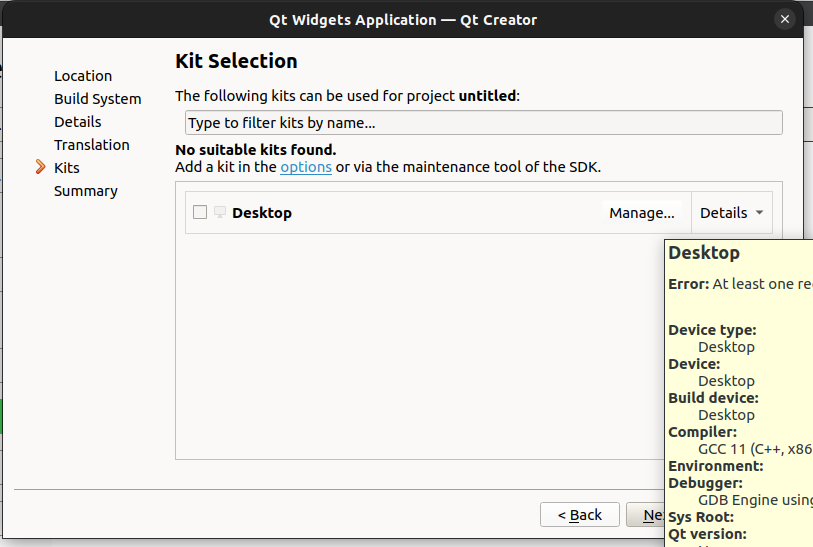
Here’s a visual guide to help you through the setup process in Qt Creator:
- First, you’ll select the Widget option for your project, setting the stage for your plugin development.
- In the Kit Selection step, make sure your development kit is correctly configured. This might involve selecting a specific compiler or Qt version, depending on your system and ROS2 setup.
- Finally, you might need to manage your kits more directly, especially if you’re working in a specialized development environment. This could involve adding a new kit and configuring it to match your ROS2 development needs.


3. RQT Plugin Basics
Welcome to the dojo of RQT plugins, where we mold the raw, chaotic energy of code into disciplined, user-friendly GUI applications. If RQT plugins were a martial art, consider this your white belt initiation.
Understanding RQT Plugin Architecture
Imagine RQT plugin architecture as a grand, bustling city. At its heart lies the main application (let’s call it the Mayor), which manages all the little plugin citizens. Each plugin is like a specialized shop in this city, offering unique services (widgets) that can be used independently or combined to create something greater, much like a thriving marketplace.
This city is built on the solid ground of Qt, with roads paved by ROS2, ensuring all plugins can communicate seamlessly, sharing topics and services like gossip across backyard fences. The architecture is designed to be modular; you can add or remove plugins without disrupting the city’s harmony. It’s urban planning at its finest, but for robots.
The Plugin Manifesto: A Declaration of Independence
Every plugin comes with a manifesto (the plugin.xml file), declaring its intentions, capabilities, and how it wishes to be recognized by the Mayor (the main application). This document ensures that every plugin plays nice and can be easily found and integrated into the bustling city life.
Core Components of an RQT Plugin
Breaking down an RQT plugin, we find it’s not just a single entity but a team of components working in harmony:
-
The GUI (Graphical User Interface): This is the face of your plugin, the part users will interact with. It’s like the shopfront, inviting and easy to navigate.
-
Backend Logic: The brain behind the operation, handling the heavy lifting, computations, and ROS communications. It’s the shopkeeper, managing transactions and making sure the customer (user) leaves happy.
-
Plugin.xml Manifest: As mentioned, this is your plugin’s ID, business license, and billboard all rolled into one, ensuring it gets the recognition it deserves.
-
Initialization Script: This is the ribbon-cutting ceremony for your plugin. It tells RQT how to start your plugin and integrate it into the grand scheme of things.
Think of crafting an RQT plugin as opening a shop in the city of ROS2. Your goal is to provide a service, attract customers (users), and contribute to the city’s (ROS community’s) growth. With the right combination of GUI charm and backend brains, your plugin could become the next big thing in the RQT cityscape.
So, grab your hard hat and blueprint. It’s time to build some plugins.
4. Designing Your RQT Plugin: The Simple Logger
Embarking on the creation of a Simple Logger RQT plugin is like setting up a diary for your robot, but instead of secrets, it’s filled with log messages. This section will guide you through planning its functionality, considering the UI design, and leveraging Qt Designer to bring it all to life. Eventhough rqtconsole exists let’s assume that it doesn’t for this tutorial.
Planning Your Plugin’s Functionality
Before we start doodling our UI, let’s establish what our Simple Logger needs to do. At its core, the plugin should:
- Capture and display ROS log messages: It should listen for log messages from your ROS system and display them in real time.
- Offer log message filtering: Users should be able to filter the displayed messages based on severity levels such as DEBUG, INFO, WARN, ERROR, and FATAL.
- Provide user control over the log display: A pause/resume feature will help users stop the flood of messages when they need to focus on specific information.
UI Design Considerations for RQT Plugins
When designing the UI for our Simple Logger, keep these principles in mind:
- Simplicity and Clarity: The main goal is to read log messages easily. A clean and straightforward layout will help users find the information they need without distractions.
- Usability: Features like filtering and pausing the message stream should be intuitive to use. Think about placing these controls within easy reach and making their functions obvious.
- Responsiveness: The UI should handle updates smoothly, without lag or jank, even when bombarded with a high volume of log messages.
Leveraging Qt Designer for UI Development
Qt Designer will be our trusty sidekick in creating the UI for our Simple Logger. Here’s a step-by-step approach to using it effectively:
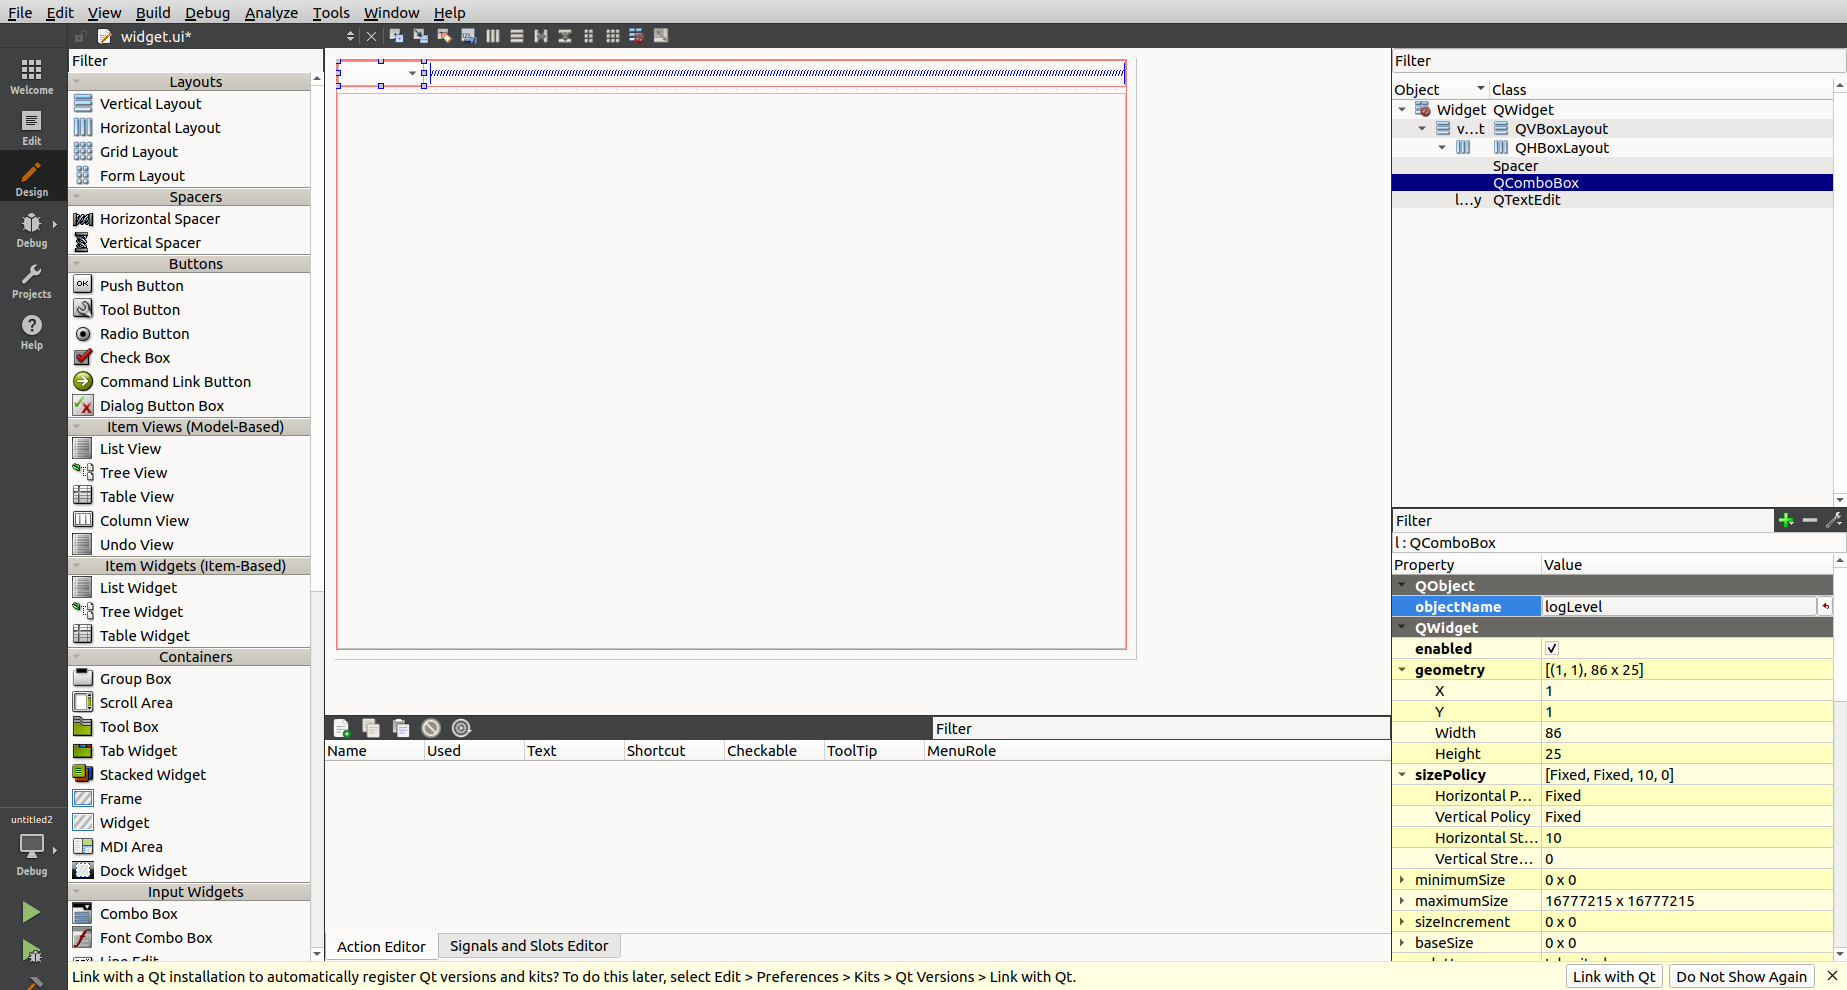
- Lay Out the Main Components: -Drag a
Vertical Layout- Drag a
QTextEditwidget into the central area. This will be where the log messages are displayed. - Now Drag a
Horizontal Layoutand Horizonatal spacer to it. - Add a
QComboBoxor a panel ofQPushButtons for the log level filters and the pause/resume feature. - Your layout should look like the image below.
- Drag a

- Customize the Widgets:
- For the
QTextEdit, enable read-only mode to prevent users from editing the log messages directly. - Customize the buttons or toolbar actions to represent different log levels and control features (e.g., icons for pause/resume, dropdown for filter levels).
- For the
- Set Object Names:
- Assign meaningful object names to your UI components. This will help you reference them easily in your cpp code when you need to update the UI or handle user actions.
- Preview and Adjust:
- Use the preview feature in Qt Designer to see how your UI looks and behaves. Adjust sizes, layouts, and styles until you’re satisfied with the design.
Following these steps, you’ll craft a UI that’s not just functional but also a joy to use. With the planning and design phase wrapped up, you’re now ready to breathe life into your Simple Logger, turning lines of code into a valuable tool for ROS enthusiasts.
5. Next Up Integrating it with ROS2 and all the other nice stuff.
Enjoy Reading This Article?
Here are some more articles you might like to read next: